GPaaS
Introduction to GPaaS
GPaaS (Gaming Platform as a Service) is a specialized PaaS setup for hosting AppWarpS2 game server applications. It works by creating a VM for you on App42 PaaS which is pre-configured with all the requirements for running AppWarpS2.
Once setup, you can update your AppWarpS2 application code anytime on your GPaaS VM just like you do with any App42 PaaS application i.e. via your GIT repository or by uploading the sources directly from your computer. With this offering, you can develop and deploy your multiplayer games using Shephertz products.
Once setup, you can update your AppWarpS2 application code anytime on your GPaaS VM just like you do with any App42 PaaS application i.e. via your GIT repository or by uploading the sources directly from your computer. With this offering, you can develop and deploy your multiplayer games using Shephertz products.
How GPaaS features help
AppWarpS2 is a server side JAVA library. So building and running AppWarpS2 requires the following to be installed on the server machine.
GPaaS VMs with the above software already installed and setup.
AppWarpS2 requires the host machine to have the following TCP and UDP ports to be opened. These are which you game clients connect to for exchanging messages with the server application. GPaaS VM instances are pre-configured with the following required ports opened.
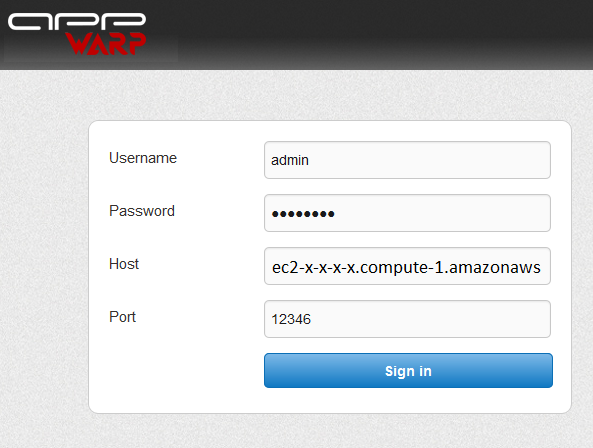
AppWarpS2 also comes with a HTML5 dashboard that can be used to monitor your running application. While this doesn’t required to be hosted on the same machine as your game server, GPaaS VM comes ready with it hosted on:
GPaaS VMs with the above software already installed and setup.
AppWarpS2 requires the host machine to have the following TCP and UDP ports to be opened. These are which you game clients connect to for exchanging messages with the server application. GPaaS VM instances are pre-configured with the following required ports opened.
AppWarpS2 also comes with a HTML5 dashboard that can be used to monitor your running application. While this doesn’t required to be hosted on the same machine as your game server, GPaaS VM comes ready with it hosted on:
In order to create your private setup of GPaaS, following steps are to be done:
- Login with your account on App42 PaaS
Use your credentials to login into App42 PaaS.
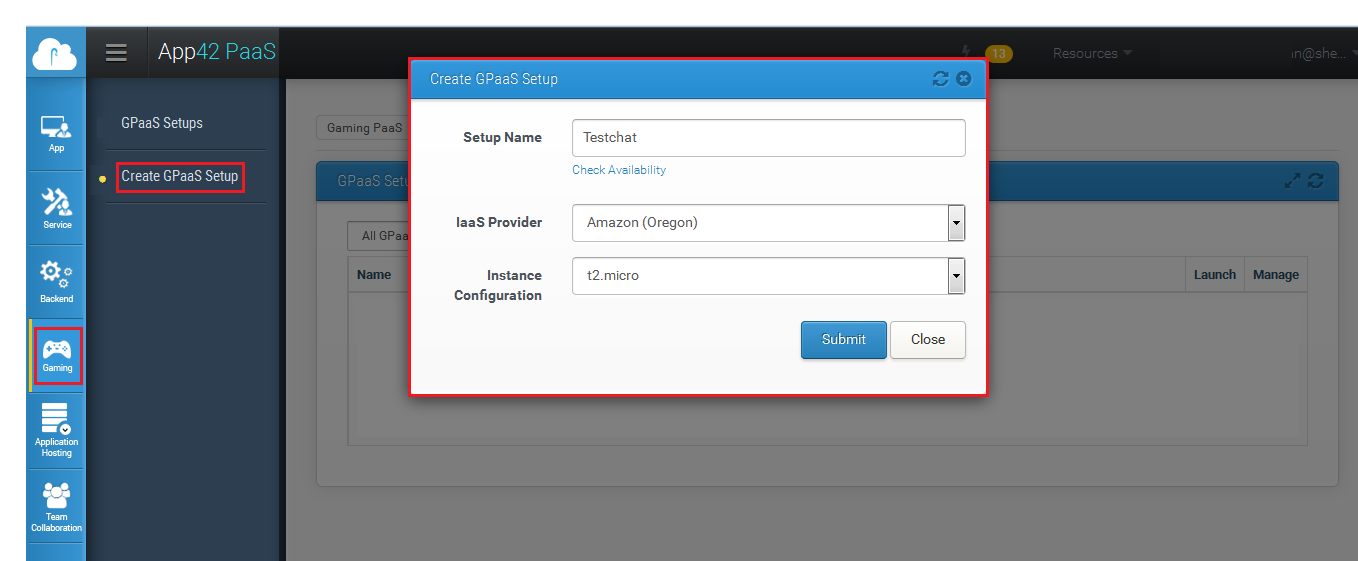
- Creating your first GPaaS setup.
Navigate to Gaming > Create GPaaS Setup and enter the mandatory information to create your GPaaS setup as shown in below image.
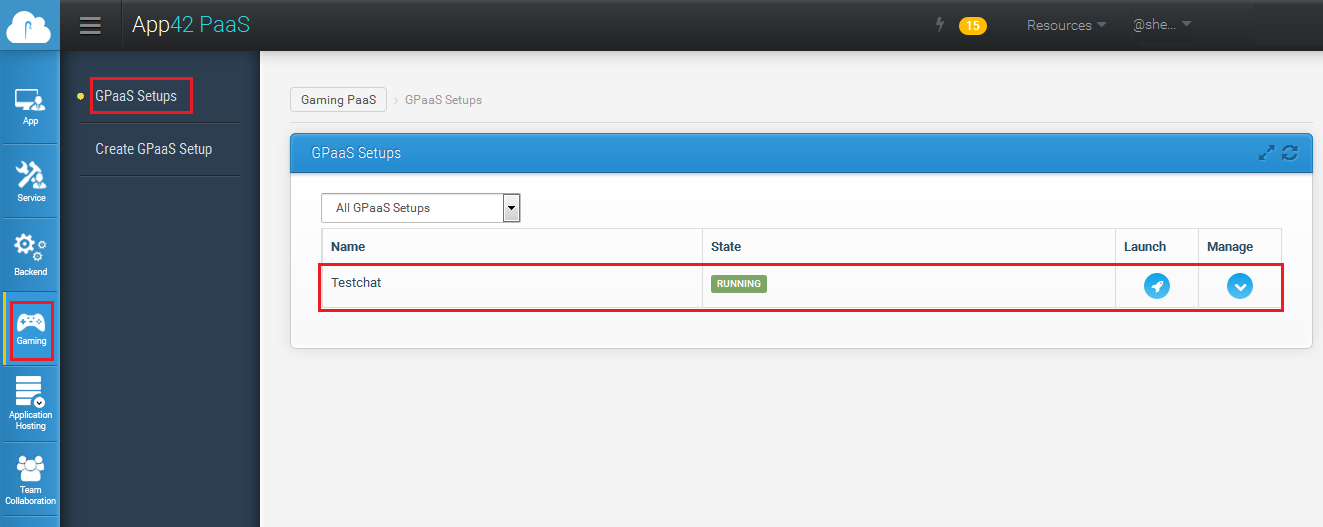
- GPaaS Setup List
Navigate to Gaming > GPaaS setups to see the setup list.
command: app42 addKeys
Add API key and Secret key
$ app42 addKeys
================= Enter your App42PaaS keys ==================
API Key      = your_api_key
Secret Key   = your_secret_key
Adding keys...done
command: app42 setupGPaaS
Setup App42 BGaaS by choosing required configuration
$ app42 setupGPaaS

Enter Setup Name: testChat
Checking Setup Name Availability... OK

1: Amazon (Oregon)
Select IaaS Provider [Amazon (Oregon)]:

1: t1.micro
2: m1.small
Select Instance Configuration [t1.micro]: 1

Do you want to add Static IP? [Yn]: n

Setting up the GPaaS infrastructure... OK

Operation is in progress, Please wait...|
GPaaS setup has been completed successfully, For details, Login to PaaSHQ console.
command: app42 gpaasSetups
List all the gpaas setups
$ app42 gpaasSetups
+-----------------------+--------------------------------------------+------------+-----------------+------------+----------------------+------------+---------------+--------------+
|                                                                                        === GPaaS Setup List ===                       |
+-----------------------+--------------------------------------------+------------+-----------------+------------+----------------------+------------+---------------+--------------+
| Created On            | App Url                           	           | Setup Name | Iaas Provider   | Setup Type       | Email                | Vm Type    | Setup Flavour | Setup Status |
+-----------------------+--------------------------------------------+------------+-----------------+------------+----------------------+------------+---------------+--------------+
| 2013-11-09 04:25:10.0 | http://ec2-x-x-x-x.compute-1.amazonaws.com | testChat   | Amazon (Oregon) | GPaaS      | admin@shephertz.com  | Dedicated  | t1.micro      | RUNNING      |
+-----------------------+--------------------------------------------+------------+-----------------+------------+----------------------+------------+---------------+--------------+
command: app42 gpaasSetupInfo
Show gpaas setup information
$app42 gpaasSetupInfo

Enter Setup Name: cloudapi
+-----------------------+--------------------------------------------+------------+-----------------+------------+---------+---------------+--------------+
|                                                                                        === GPaaS Details ===                       |
+-----------------------+-----------------------------------------+------------+-----------------+------------+------------+---------------+--------------+
| Created On            | App Url                                            | Setup Name | Iaas Provider   | Setup Type     | Vm Type    | Setup Flavour   | Setup Status |
+-----------------------+---------------------------------------- +------------+-----------------+------------+------------+---------------+--------------+
| 2013-11-09 04:25:10.0 | http://ec2-x-x-x-x.compute-1.amazonaws.com   | testChat   | Amazon (Oregon) | GPaaS    | Dedicated  | t1.micro        | RUNNING      |
+-----------------------+-----------------------------------------+------------+-----------------+------------+------------+---------------+--------------+
Now to deploy your own application on your GPaaS VM, you have the option of either uploading your code from your computer or we can fetch it from your GIT repo. In both the cases, you need to follow a directory structure described below.
Application directory structure requirement
When hosting your AppWarpS2 application on to GPaaS, your application should follow a certain directory structure that our building and running scripts expect. This structure is also followed by our samples which can be used as a reference.
Ensure that your application is developed according to the following top level folder structure if you are going to be building and running using the provided ANT script.
The src folder should contain Main.java and your server application and extension classes for different domain adaptors.
The libs folder contains the library files(jar) that will be used by the server application. These include among other JARs the AppWarpS2.jar file.
AppConfig.json file contains the server configuration variables which are
warp.xml file contains the ant script which is used to build and run server.
For example in the given SpaceWarFare sample application, the java src classes are declared in the package “spacewarfare”. You should edit this file according to your package name by editing the following line in the warp.xml file.
Ensure that your application is developed according to the following top level folder structure if you are going to be building and running using the provided ANT script.
./src
./libs
./AppConfig.json
./warp.xml
The libs folder contains the library files(jar) that will be used by the server application. These include among other JARs the AppWarpS2.jar file.
AppConfig.json file contains the server configuration variables which are
"TickTime" : "500" (Timer Event in milliseconds)
"LogLevel" : "WARN" (ALL, DEBUG, FATAL, ERROR, INFO, WARN, OFF, TRACE)
"AdminUsername" : "admin" (Admin UserName)
"AdminPassword" : "password" (Admin Password)
"HSQLDBFile" : "HSQLDBFile" (path for HSQLDB files by default files will be created in running directory)
"LICENSE_KEY" : "x45-tp0987-1276" (your AppWarp S2 license key)
warp.xml file contains the ant script which is used to build and run server.
For example in the given SpaceWarFare sample application, the java src classes are declared in the package “spacewarfare”. You should edit this file according to your package name by editing the following line in the warp.xml file.
Deploying AppWarpS2 Application on App42 PaaS
Once you have created your AppWarpS2 application you can deploy it on App42 PaaS (GPaaS) platform.
Starting/Stopping GPaaS on App42 PaaS
-
You can simply click on “Manage” in GPaaS setups. Under Manage, click on the “Start/Stop” icon of your App42WarpS2 application. This will only “Start/Stop” your application.

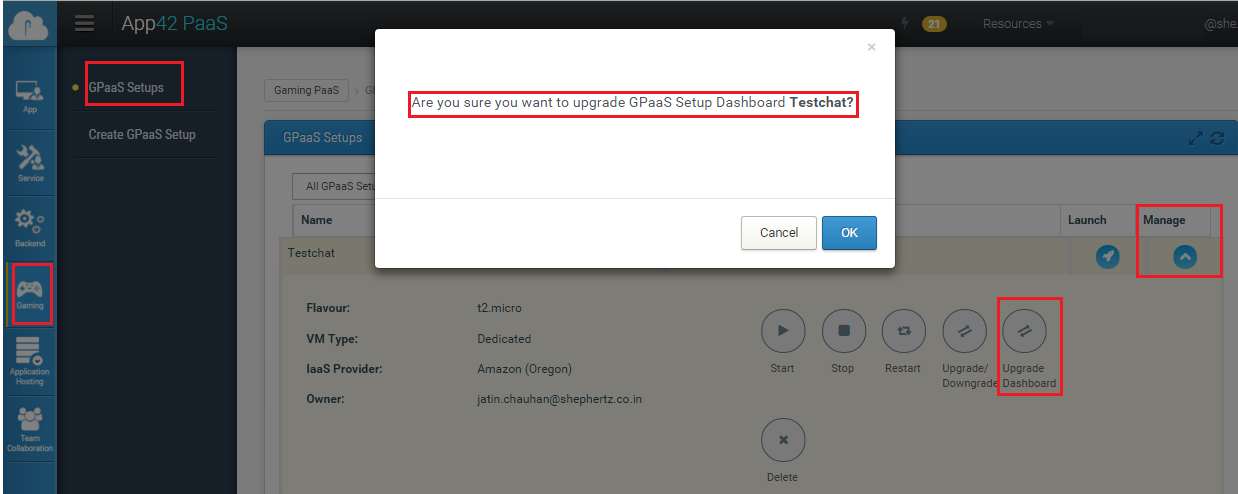
Upgrade GPaaS Dashboard
You can upgrade your GPaaS Dashboard by navigating to the ‘Manage’ in GPaaS Setups and then click on the ‘Upgrade Dashboard‘ as shown below: